Are you struggling to manage multiple email addresses for different roles or projects? Adding an alias email in Active Directory can help streamline your communications without the hassle of logging into different accounts. However, navigating the setup process can be confusing, especially if you’re not tech-savvy, leading to mistakes that might not link the alias correctly.
In this guide, we’ll break down the process into simple, easy-to-follow steps to ensure you can add an alias email effortlessly. We’ll help you avoid common pitfalls and make sure your new email alias works seamlessly with your existing account, boosting your efficiency and organization. Let’s dive in and simplify your email management!
What Is An Email Alias?
An email alias is an additional email address linked to a single primary account. It allows the user to receive emails sent to multiple addresses in one inbox. This feature is often used by individuals or organizations that need more than one email address for different purposes, without the hassle of managing separate accounts.
For instance, a primary email like john.smith@company.com might have an alias such as sales@company.com. Both emails will direct messages to the same inbox, but users can respond to different needs without switching accounts. It helps maintain organization and clarity, especially when handling multiple tasks.
In Active Directory (AD), an email alias works by associating these extra email addresses with a user’s account. AD users can have various aliases, and the emails sent to these aliases appear in the same primary inbox. These aliases are linked to the email attributes of a user in AD, allowing administrators to control and manage them.
Email aliases offer convenience by enabling multiple ways to reach a single account without needing multiple logins. This is especially helpful for businesses that need to manage different roles or departments within the same user account structure.
What Is The Role Of Email Address Attributes In Active Directory(AD)?
In Active Directory (AD), email address attributes play a key role in managing and organizing user email accounts. These attributes are part of the user’s profile and define how the system handles email addresses, including both primary and alias addresses. Through AD, administrators can assign, modify, and manage email addresses within the organization’s domain.
One important attribute related to email in AD is the proxyAddresses attribute. This attribute contains both the primary and alias email addresses for a user. The format used in the proxyAddresses attribute helps define whether the email address is the main one or an alias. For example, an entry like SMTP: .doe@company.com indicates a primary address, while smtp: @company.com would be an alias. The use of “SMTP” in uppercase signals the primary email, while lowercase “smtp” denotes an alias.
These email attributes ensure that emails sent to any of the user’s addresses are routed to the correct account. The Active Directory attribute editor is often used to view and modify these attributes. It allows administrators to access and manage users’ AD emails, ensuring that changes, like adding an alias or changing the primary email address in Active Directory, are reflected properly.
Another key function of these attributes is to maintain consistency across multiple systems, such as mail servers and directories. Since AD is often integrated with Microsoft Exchange or other email services, these attributes allow seamless communication between AD and the email system.
Overall, the email attribute in Active Directory manages how email addresses (both primary and alias) are assigned and ensures that emails are delivered properly. Managing these attributes is crucial for organizations that rely on efficient email communication and user account management.
How To Add Alias Email In Active Directory?
Adding an alias email in Active Directory (AD) allows a user to receive emails from multiple addresses without having separate accounts. To add an alias email in Active Directory (AD), there are specific steps and requirements you need to follow.
Requirements To Add Alias Email In Active Directory
- Administrator Access: You’ll need administrative privileges to access and modify user accounts in AD. Without this access, you won’t be able to add or modify email attributes.
- User Account: Ensure the user account to which you want to add the alias is active and exists in AD. You will be modifying the properties of this account to add the alias.
- Email Policy: Check your organization’s email policy. Some organizations have guidelines on the format or usage of email aliases, especially when managing large domains or multiple accounts.
Step-By-Step Guide To Adding An Alias Email In Active Directory
Log In To Your AD Management Console: You’ll need to access the Active Directory Users and Computers (ADUC) tool to manage email addresses for user accounts. This tool is available in Windows Server.
Open ADUC:
- Press “Windows + R” to open the Run dialog box.
- Type “dsa.msc” and press Enter.
This will launch the Active Directory Users and Computers (ADUC) console.
Select The User Account:
- Navigate through the directory to find the user account you want to modify.
- Ensure that the “Advanced Features” option is enabled. You can check this by clicking “View” in the top menu and ensuring “Advanced Features” is checked.
- Once the correct user account is located, right-click the account and select “Properties.”
Access The Attribute Editor Tab:
- In the user’s Properties window, you will see several tabs. The tab we need is the “Attribute Editor.”

- If the Attribute Editor tab is not visible, ensure that Advanced Features is enabled under the View menu (as mentioned earlier).
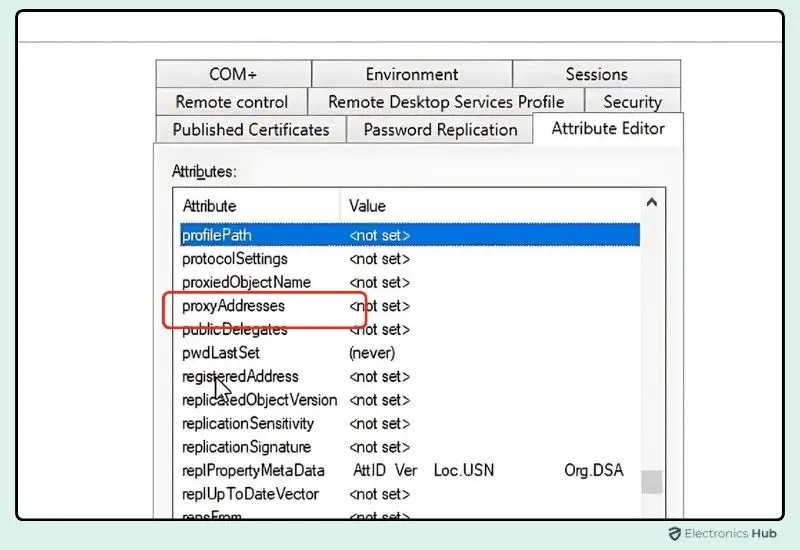
Find And Modify The ProxyAddresses Attribute:
- Scroll through the list of attributes to find proxyAddresses.
- Double-click on” proxyAddresses” to open its properties. This is where email addresses, both primary and aliases, are stored.
Add The Alias Email:
- In the proxyAddresses field, you’ll see entries like”SMTP:@example.com.” The format is key.

- To add an alias, use the format smtp:@example.com. Ensure that “smtp” is in lowercase, which indicates it’s an alias email address. If you use “SMTP” in uppercase, the system will treat it as a primary email.
Save The Changes:
- After adding the alias email, click “OK” to save the changes to the proxyAddresses attribute.
- You can now close the Attribute Editor tab and the user’s Properties window.
Exit ADUC: Once you’ve made the necessary changes, close the Active Directory Users and Computers management console.
By following these steps, you’ve successfully added an email alias to a user account in Active Directory. The alias will now route emails to the user’s primary inbox without needing to create or manage a separate account.
How Do I Know That An Email Alias Is Successfully Added In AD?
Once you’ve added an email alias in Active Directory (AD), it’s important to verify that the changes have been applied correctly. Here are several ways to confirm that the alias email is working as expected.
- Wait For Some Time: After adding an alias, keep in mind that changes may not take effect immediately. It can take up to 24 hours for the updates to propagate throughout the system, especially in larger organizations where multiple servers and services are involved. During this time, the email alias might not function fully across all devices or services.
- Test The Alias Email: A quick way to verify if the alias is working is to send a test email to the new email alias. Simply compose an email and send it to the alias address you added. For example, if you added alias@example.com to a user with a primary email of user@example.com, send a message to alias@example.com.
- Check The User’s Inbox: The user should receive the email sent to the alias in their primary inbox. If the email appears, it confirms that the alias is correctly linked to the account.
- Verify Sending From The Alias: In addition to receiving emails through the alias, the user should also be able to send emails from both the primary and alias addresses. Most email clients, like Microsoft Outlook, allow the user to choose which address they want to send from.
- Send A Test Email: Open the user’s email client and try sending an email from the alias address. If the alias is functioning properly, the user will be able to select the alias from the “From” field and send the message.
- If this option is not available immediately, ensure that the email client settings allow users to send from alternative email addresses and that the alias has been properly configured in the system.
- Check Email Logs Or AD For Confirmation: For administrators, an additional way to ensure the alias was added correctly is by reviewing AD logs or using a PowerShell command to check user attributes in AD. This step can provide extra confirmation that the proxyAddresses attribute has been updated with the new alias. Use the Get-ADUser PowerShell command to review a user’s proxyAddresses attribute:
| Get-ADUser -Identity “username” -Properties proxyAddresses |
This command will display the list of email addresses (primary and aliases) assigned to the user. If the alias appears in the results, you can be confident the alias is set up correctly.
Expert Guide: Tips To Troubleshoot Email Alias Issues
When managing an email account, encountering issues with email aliases can be frustrating. These aliases are alternate addresses that route to the primary email, offering a way to manage various roles or identities without needing multiple inboxes. Here’s an expert guide to help you troubleshoot common email alias issues:
- Check Propagation Time: Ensure you’ve waited up to 24 hours for changes to propagate throughout the system, especially in larger environments.
- Verify Alias Format: Double-check the proxyAddresses attribute in AD. Ensure the alias is entered in the correct format, such as smtp:@example.com (lowercase “smtp” for aliases).
- Ensure Advanced Features Are Enabled: If you can’t find the Attribute Editor tab in ADUC, make sure Advanced Features is enabled under the View menu.
- Review Exchange Server Settings: If you’re using Microsoft Exchange, verify that the server recognizes the alias. Sometimes email settings need to be synchronized between AD and Exchange.
- Check Email Client Settings: If the user can’t send emails from the alias, ensure their email client (e.g., Outlook) is configured to allow sending from alternative addresses.
- Verify SMTP Service: Ensure that your organization’s SMTP service is correctly configured to recognize and route emails sent to aliases.
- Test With Multiple Devices: If the alias works on one device but not another, check if the email client settings on each device are updated and configured correctly.
- Check Domain Policies: Make sure the added alias is under a domain that is allowed by your organization’s email policy. Some policies restrict aliases to specific domains.
- Look For Conflicting Attributes: Ensure there are no conflicting attributes or duplicate email aliases that might cause issues with delivery.
FAQs:
You may want to add an alias email to provide multiple ways for someone to contact a user or to transition from an old email address to a new one without losing important emails.
Yes, you can add multiple alias emails for a single user. The user will be able to receive emails sent to any of those alias addresses, but they will all be delivered to the primary mailbox.
No, permissions are applied to the user account or mailbox as a whole, not to individual alias emails. This means that an alias email inherits the same permissions as the primary email address.
No, alias emails can only be created for users within Active Directory. For external contacts, you can create mail contacts in Active Directory but cannot assign them aliases in the same way.
Conclusion
In conclusion, adding alias email addresses in Active Directory is a straightforward process that can significantly enhance user management and communication within your organization. By following the outlined steps, you can create alias emails that are linked to existing user accounts, allowing for easier identification and management of multiple email addresses. This feature is particularly useful for shared inboxes, department-specific email addresses, or when users require multiple email addresses for different purposes.
