Are you worried about malware and viruses sneaking into your computer? It can be really stressful not knowing if your files and personal information are safe. Microsoft Windows Defender is a built-in tool in your computer that helps you fight against these threats, keeping your device secure without needing extra software.
Using Windows Defender to scan for malware is straightforward. This guide will show you how to activate and run a scan, ensuring your computer stays protected. Whether you’re not very tech-savvy or just looking for a quick way to check your computer’s health, this step-by-step guide has you covered.
Overview Of Microsoft Windows Defender
Microsoft Windows Defender is a built-in security tool that provides real-time protection against malware, viruses, and other security threats. It’s designed to work seamlessly within the Windows 10 and Windows 11 operating systems, ensuring that users have access to a free virus scanner without the need to install third-party software. With features like automatic updates, quick scans, full scans, and the ability to customize how you want to protect your system, Windows Defender is a reliable choice for everyday virus protection.
One of the key advantages of Windows Defender Antivirus is that it runs quietly in the background, protecting your computer without consuming too many system resources. Whether you’re browsing the web, downloading files, or using external drives, Defender ensures that your system is continuously monitored for threats.
If you’re looking for virus protection for Windows 10 or Windows 11, this antivirus solution offers multiple layers of security. It also integrates with cloud-based protection and automatic sample submission to help identify and remove potential threats as quickly as possible.
In addition to basic malware protection, it includes advanced tools like PowerShell and Command Prompt to run specialized scans. This makes it a comprehensive solution for protecting your computer from malicious software.
How To Enable Windows Defender?
If you’re looking to protect your system from malware, enabling Windows Defender is the first step. By default, Windows Defender comes pre-installed and active on both Windows 10 and Windows 11. However, if it’s been disabled or if you’re switching from another antivirus software, you may need to enable it manually. Here’s how to get Windows Defender Antivirus up and running on both versions.
Enabling Windows Defender On Windows 11
In Windows 11, enabling Windows Defender is simple and quick. The user interface is modern and optimized for easy access to security settings. Here are the steps to turn it on:
- Click on the “Start” menu and open “Settings.”
- Navigate to “Privacy & Security” and select “Windows Security.”

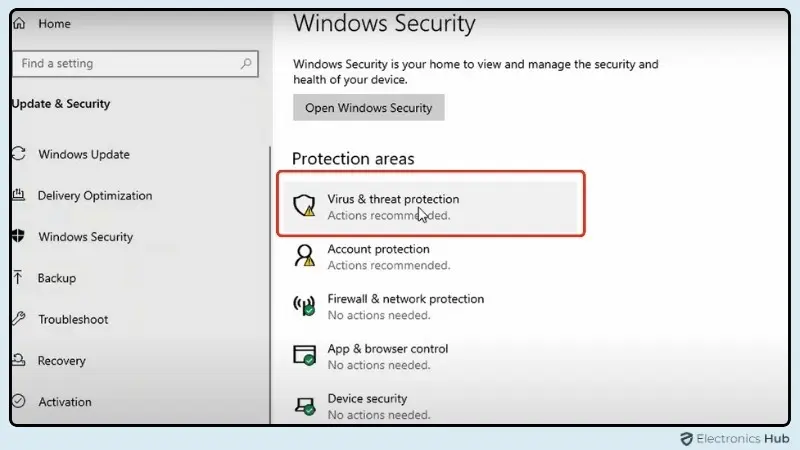
- Under “Protection Areas”, click on “Virus & threat protection.”

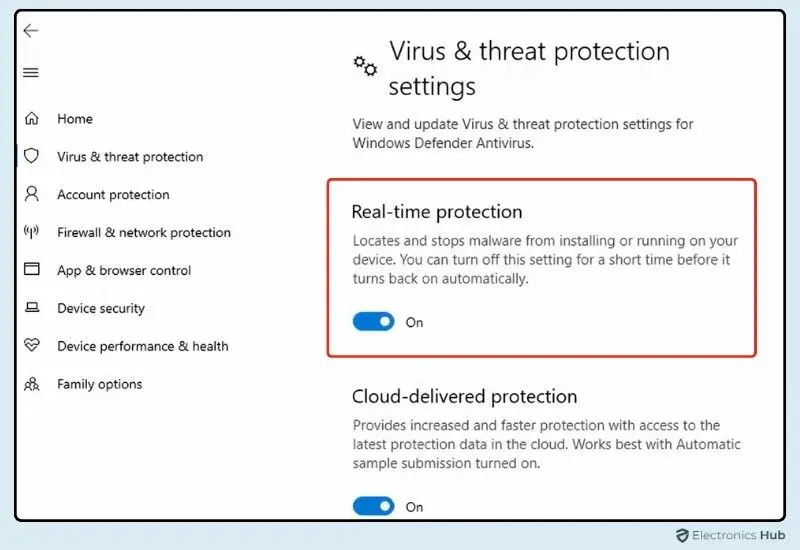
- In the new window, go to “Manage settings” under Virus & Threat Protection settings.

- Turn on “Real-time protection” to enable Windows Defender.

Enabling Windows Defender On Windows 10
For those using Windows 10, the process to enable Defender Windows is nearly identical but with a slightly different layout. Follow these steps:
- Open the “Start” menu and click on “Settings.”
- Go to “Update & Security” and select “Windows Security” from the sidebar.

- Click on “Virus & threat protection.”
- In the next window, click on “Manage settings” under Virus & threat protection settings.

- Toggle the switch for “Real-time protection” to turn on Windows Defender.
How To Use Microsoft Windows Defender To Scan For Malware?
Scanning your system for malware is one of the most important tasks in maintaining a secure computer. With Windows Defender, you can perform various types of scans to detect and remove threats. Whether you’re performing a quick check or a deep system scan, Windows Defender Antivirus provides multiple options for keeping your PC safe from malware.
Perform Quick Scan
A quick scan is ideal for checking the most vulnerable parts of your system, such as running processes, system memory, and startup files. This type of scan focuses on areas where malware is most likely to hide and typically takes only a few minutes to complete. While it doesn’t scan every file on your computer, it’s a fast and efficient way to ensure your system is safe from immediate threats.
Here’s how to run a quick scan using Windows Defender:
- Click on the “Start” Menu and go to “Settings.”
- Navigate to “Privacy & Security” (on Windows 11) or “Update & Security” (on Windows 10).
- Select “Windows Security” and choose “Virus & Threat Protection.”
- Under the Current Threats section, click “Quick Scan.”

Windows Defender will begin scanning and display the results once complete. If any threats are detected, you can choose how to handle them, including removing or quarantining the malware.
Perform Full Scan
A full scan is a more thorough process that checks all the files and programs on your system, including those on external drives. This scan is ideal if you suspect malware has entered your system and want to ensure that every file and directory is examined. Since it checks every file, it can take much longer than a quick scan, but it offers a more comprehensive check for threats.
Here’s how to run a full scan using Windows Defender:
- After clicking on “Virus & Threat Protection,” Scroll down and click on “Scan Options.”

- Select “Full Scan” from the list of available options.

- Click “Scan Now.”
The scan will begin, and depending on the size of your system and the number of files, it may take some time to complete. Once finished, Windows Defender will display any detected threats, allowing you to decide how to handle them.
Perform Custom Scan
A custom scan allows you to choose specific files, folders, or drives to scan. This option is useful if you suspect malware in a particular location or want to avoid scanning your entire system.
Once you reach the “Virus & Threat Protection” section, follow these steps:
- Under the Current Threats section, click “Scan Options.”
- Select “Custom Scan” from the list.

- Click “Scan Now.”
- A new window will open, allowing you to select the specific files, folders, or drives you want to scan.
- After selecting your desired locations, click “Select Folder” to start the scan.
The scan will run only in the areas you’ve chosen, and any detected threats will be displayed for you to address.
Scan For Malware With Powershell
For users who prefer command-line tools, PowerShell offers a way to run Windows Defender scans with more control. Whether you need a quick, full, or custom scan, using PowerShell allows you to initiate scans directly without navigating through menus. This method is particularly useful for advanced users or system administrators.
Here’s how to scan for malware using PowerShell:
- Press Windows + X and select Windows Terminal (Admin) or PowerShell (Admin) to open PowerShell with administrative privileges.
- To run a quick scan, type the following command:
| Start-MpScan -ScanType QuickScan |

- For a full system scan, use this command:
| Start-MpScan -ScanType FullScan |
- To perform a custom scan, use:
| Start-MpScan -ScanType CustomScan -CustomScanPath “C:\Path\To\Custom\Folder” |
- Replace “C:\Path\To\Custom\Folder” with the actual path of the folder or file you want to scan.
- Press Enter, and Windows Defender will begin scanning based on the command you’ve entered.
- After the scan is complete, results will be displayed directly in the PowerShell window.
Using PowerShell provides flexibility for scheduling scans, integrating them into scripts, or executing more advanced tasks.
How To Schedule Malware Scans On Windows Defender?
Scheduling scans with Windows Defender allows you to automate regular malware checks, ensuring that your system stays protected without manual intervention. This feature is especially useful if you prefer to run scans during off-hours or while the system is idle.
Follow these steps to schedule a scan on Windows Defender:
- Open Task Scheduler: Press “Windows + S” and type “Task Scheduler,” then click on it from the search results.
- Navigate To Windows Defender Task: In the left panel, expand Task Scheduler Library > Microsoft > Windows > Windows Defender.

- Edit The Task: In the middle panel, locate “Windows Defender Scheduled Scan.” Right-click on it and choose “Properties.”

- Set The Schedule:
- Go to the “Triggers” tab and click “New.”

-
- Here, you can specify how often you want the scan to run (daily, weekly, or monthly) and the time of day.

-
- After setting the schedule, click “OK.”
- Finalize The Settings: After setting the trigger, go to the Actions tab, confirm that the action is set to “Start a Program” with the correct Windows Defender program path, and click OK.
Your scheduled scan will now run automatically based on the frequency and time you’ve specified, keeping your system protected without any manual action.
How To Check Virus Protection Updates On Windows?
Keeping your virus protection up to date is key to safeguarding your system from the latest threats. Windows Defender updates regularly through Windows Update, but you can also manually check for the latest definitions.
Here’s how to check for virus protection updates using Windows Defender:
Through Virus & Threat Protection:
- Open “Settings” and go to “Privacy & Security” (Windows 11) or “Update & Security” (Windows 10).
- Click on “Windows Security” and select “Virus & Threat Protection.”
- Scroll down to “Virus & Threat Protection Updates.”
- Click on “Protection Updates.”
- If any updates are available, they will automatically install. You can also click “Check for Updates” to manually initiate the process.
Through Windows Update:
- Open Settings and navigate to “Windows update.”
- Then select “Check for Updates.”
- If there are new Windows Defender Antivirus updates, they will download and install automatically.
Regularly checking for updates ensures that Windows Defender has the latest virus definitions to keep your system protected.
Also Read: How To Stop Windows 11 Updates?
Is Windows Defender Enough To Avoid Viruses & Malware?
Windows Defender has evolved into a robust antivirus solution for Windows 10 and Windows 11 users. It offers real-time protection, regular updates, and several scan options that are designed to detect and remove various forms of malware. Many users rely solely on Windows Defender Antivirus for day-to-day virus protection without installing third-party software.
While Windows Defender provides good protection, it may not be enough for users who need advanced security features. For example, it lacks some features found in premium antivirus solutions, such as detailed web filtering, advanced firewall controls, or specialized ransomware protection. Users who frequently visit risky websites, download files from unknown sources, or need stronger privacy features might benefit from additional security layers.
That said, for regular users who browse the web responsibly and use trusted software, Windows Defender is often sufficient. It runs in the background, uses minimal system resources, and integrates seamlessly with the Windows environment, making it a convenient option for most people.
For enhanced protection, you could consider combining Windows Defender with other security measures, such as using a reliable VPN, practicing safe browsing habits, and regularly backing up important data.
Tips To Prevent Viruses & Malware
While Windows Defender provides a solid defense against malware, combining it with good security practices helps to keep your system even safer. Here are some practical tips to further protect your computer from viruses and malware:
- Keep Software Updated: Regularly update your operating system and applications to ensure you have the latest security patches. Cybercriminals often exploit outdated software.
- Be Cautious With Downloads: Avoid downloading files or programs from untrusted websites. Always verify the source before installing software on your system.
- Use Strong Passwords: Ensure that your passwords are complex and unique for different accounts. Consider using a password manager to keep track of them.
- Enable Two-Factor Authentication: Adding an extra layer of security to your accounts can prevent unauthorized access, even if your password is compromised.
- Beware Of Phishing: Be cautious with emails or messages that ask for sensitive information or direct you to suspicious websites. Always verify the legitimacy of the sender before clicking on links or attachments.
- Avoid Public Wi-Fi: If you need to use public Wi-Fi, consider using a VPN to encrypt your data and protect your online activity.
By following these tips, you can enhance your Windows Defender protection and reduce the chances of malware infecting your system.
FAQs:
Yes, Windows Defender has an Offline Scan option. This feature allows you to restart your computer and perform a scan that runs outside of the normal Windows environment, which is useful for finding and removing persistent or hard-to-detect malware.
For routine protection, it’s recommended to run a Quick Scan at least once a week and a Full Scan periodically, especially if you download files frequently or notice unusual behavior on your system.
If malware is detected, Windows Defender will notify you of the threat. It will either quarantine the malicious file, delete it, or prompt you for action based on the type of threat. You can view and manage quarantined items in the Protection history under the Virus & Threat Protection settings.
Real-time protection is a feature in Windows Defender that actively monitors your device for threats and blocks malware as soon as it’s detected. It continuously scans files as you download or open them to ensure they’re safe.
Windows Defender can detect and remove certain types of ransomware. Additionally, it includes Controlled Folder Access, which helps protect your files from unauthorized changes by ransomware and other malicious software.
Windows Defender automatically scans USB drives and other external devices when they are connected to your computer. You can also perform a manual scan by selecting the drive in a Custom Scan.
Conclusion
This is it from our end how to use Microsoft Windows Defender to keep your computer safe from malware. Were these steps easy to follow? Regular scans can really help keep your system secure. If you have any questions or need a bit more guidance, don’t hesitate to ask. We’re here to help you keep your computer protected with ease.
