Partitioning a hard drive on your Windows computer might sound complicated, but it’s a useful skill to have. It lets you organize your files better, run different operating systems, or even boost your computer’s performance. If you’ve ever felt lost trying to find files in a cluttered system or worried about your computer slowing down, partitioning can help!
Starting the process can be daunting if you’re not a tech whiz. You might worry about messing something up or losing important data. This guide will walk you through each step to partition your hard drive safely and easily, ensuring you can do it confidently without any tech headaches.
What Is Hard Drive Partitioning?
Hard drive partitioning is the process of dividing a single disk drive into multiple, independent sections. These sections, called partitions, allow users to treat one physical drive as though it’s made up of separate drives. Each partition can have its own operating system, file system, or purpose, making it easier to organize data and manage storage efficiently.
When you partition a drive, you can dedicate one section to your operating system and another to personal files like documents, images, and videos. This separation helps in keeping things organized and improving system performance. Partitioning also comes in handy for creating recovery sections, which can store important files or a copy of the operating system in case of failure.
Windows allows users to create, manage, and delete partitions through built-in tools. You can set up different partitions during initial installation or modify them later. Whether you’re installing a new operating system or creating space for backups, partitioning provides flexibility in managing storage.
Why partition your hard drive? It can improve performance by reducing clutter, isolating files for better access, and even increasing security by keeping sensitive files on a separate partition. If a section of your hard drive gets corrupted, the rest remains safe.
Partitioning is commonly done during initial setup, but you can also modify or add new drive partitions later. Windows provides built-in tools like Disk Management that make the process straightforward. Whether you’re setting up a new system or reorganizing your existing data, knowing what hard drive partitioning is, is a key part of managing your storage efficiently.
How To Partition A Hard Drive In Windows?
Partitioning a hard drive in Windows is a fairly simple process using the built-in Disk Management tool. Whether you’re looking to organize your files better, install another operating system, or allocate space for backups, partitioning can help manage your disk space efficiently.
Note: Before proceeding with any changes to your hard drive, it’s important to backup your data. Partitioning can lead to data loss if not done correctly, especially if mistakes are made during the process. Having a backup ensures your important files remain safe.
Now, let’s walk through the steps to partition a hard drive in Windows:
Step 1: Open Disk Management:
- Press “Windows Key + X” or right-click on the “Start” button.
- From the menu, select “Disk Management.” This tool allows you to view and manage your drives and partitions.
Step 2: Select The Drive To Partition:
- In the Disk Management window, locate the drive you want to partition.
- If the drive is new and unallocated, you can skip to Step 4. If you’re partitioning an existing drive, you’ll need to shrink an existing volume to create space for the new partition.
Step 3: Shrink An Existing Volume (If Necessary):
- Right-click on the drive you want to partition and select “Shrink Volume.”

- Windows will automatically calculate the maximum amount of space you can shrink. Enter the amount of space (in MB) you want to allocate for the new partition and click “Shrink.”

- After shrinking, you’ll notice a new section labeled Unallocated Space in the Disk Management window.

Step 4: Create A New Simple Volume:
- Right-click on the Unallocated Space and select “New Simple Volume.”

- Follow the on-screen wizard to set up the new volume. You’ll be asked to enter the amount of space (in MB).

- Assign a drive letter (this is how the partition will appear in File Explorer, like D: or E:).

- Choose a file system. NTFS is the recommended option for Windows, while exFAT can be used if you plan to share data with other operating systems.

Step 6: Finish Partitioning:
- Once the wizard completes, your new partition will be created. It will appear as a new drive in File Explorer under This PC.

With these steps, you can efficiently create new partitions for better file management or system usage. Your new partition is now ready to use, and you can store data or even install an additional operating system if needed.
How To Format A Hard Drive In Windows?
Formatting a hard drive is often necessary when setting up a new drive or cleaning up an existing one. It prepares the drive for use by organizing its file system, whether it’s for storing data or installing an operating system.
Note: Keep in mind that formatting erases all data on the partition, so make sure you’ve backed up any important files before proceeding.
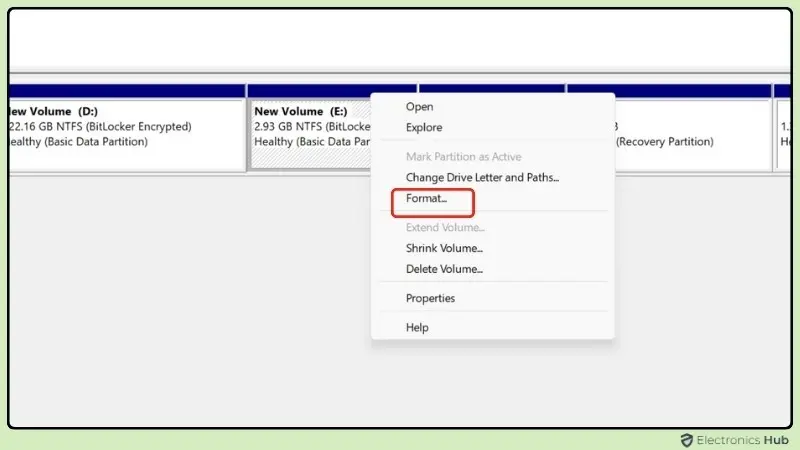
- In the Disk Management window, locate the partition or drive that you want to format.
- Right-click on the partition and choose “Format” from the context menu.
- You’ll need to select a File System. For most Windows users, NTFS is the best option as it supports large files and provides better security.
- If you plan to share the drive with other operating systems (like macOS or Linux), exFAT is a good alternative since it is supported by multiple platforms.
- If you want to format the partition quickly, check the box for Perform a quick format. This will skip a deeper scan of the disk but will still prepare it for use.
- If you want a full format, leave the box unchecked. A full format takes longer but scans the drive for errors.

- After selecting the file system and whether to perform a quick format, click “OK” to confirm your choices.
- A warning will pop up reminding you that formatting will erase all data. Click “OK” again to proceed.
Once the formatting process completes, the partition will be ready for use, and you can begin storing files on it.
Also Read:
How To Delete Partitions In Windows?
Deleting a partition in Windows allows you to free up space or reorganize your disk. Removing a partition erases all data stored on that section of the drive, so ensure you have backed up any important files before proceeding. After a partition is deleted, its space becomes unallocated and can be used to create new partitions or extend existing ones.
- In Disk Management, find the partition you want to delete. Make sure you’ve selected the correct one, as deleting it will remove all data from that section.
- Right-click on the partition you want to remove and select “Delete Volume” from the context menu.

- A warning will appear, letting you know that all data on the partition will be erased. Confirm by clicking “Yes.”

- Once the partition is deleted, it will show up as Unallocated space in Disk Management. You can use this unallocated space to create a new partition or extend an existing partition.
After you delete the partition, you can right-click on any existing partition and select Extend Volume to make use of the newly unallocated space or create a new partition by right-clicking on the unallocated space and selecting New Simple Volume.
Benefits Of Partitioning A Hard Drive
Partitioning a hard drive offers several advantages, allowing users to better manage storage, improve organization, and boost performance. Here are some key benefits:
- Improved File Organization: Partitioning drives allows you to separate different types of files, such as system files, applications, and personal data. This makes it easier to find and manage your files, preventing clutter in a single large partition.
- Better System Performance: By keeping your operating system on one partition and your files on another, your system can access data more efficiently. It reduces the load on the operating system, making your computer run faster.
- Enhanced Data Security: If your main operating system partition becomes corrupted or compromised, other partitions remain unaffected. This means that your important files on another partition are more likely to stay safe even if there’s a system failure.
- Easier Backup And Recovery: Having a dedicated partition for backups or a recovery partition can simplify the process of restoring your system. If your system crashes, you can recover from the backup without affecting your other data.
- Dual Boot Systems: Partitioning allows you to install multiple operating systems on one hard drive. For example, you can run both Windows and Linux on separate partitions and choose which to boot from.
- Efficient Space Management: You can allocate disk space to different partitions based on your needs, preventing the main partition from becoming overloaded. You can also resize partitions as your storage needs change.
Partitioning your hard drive can lead to better organization, performance, and protection of your data. It’s a smart way to make your storage more manageable.
Tips For Hard Drive Partitioning
When partitioning a hard drive, it’s helpful to keep a few tips in mind to ensure a smooth and efficient process. Proper planning and management of your drive partitions can prevent issues down the road. Here are some tips to guide you:
- Plan Your Partitions Before Starting: Decide how many partitions you need and the size of each one based on your storage requirements. For example, you might want a partition for your operating system, another for files, and a third for backups. Proper planning prevents the need for re-partitioning later.
- Allocate Enough Space For The Operating System: Always ensure your primary partition, which holds the operating system, has enough space. Windows requires a significant amount of storage, and additional space is needed for updates and applications. A good rule of thumb is to allocate at least 100 GB or more, depending on your usage.
- Use NTFS For Windows Partitions: NTFS is the preferred file system for Windows partitions. It supports larger files and offers better security features than other file systems like FAT32. If you plan to use your drive with multiple operating systems, exFAT may be a better choice for sharing data.
- Backup Data Before Modifying Partitions: Anytime you’re creating, resizing, or deleting partitions, always backup your data. There’s a chance that something could go wrong during the process, leading to data loss.
- Avoid Too Many Partitions: While partitioning can improve organization, having too many small partitions can become difficult to manage. Stick to a manageable number of partitions based on your specific needs.
- Consider A Dedicated Partition For Backups: Having a separate partition dedicated to backups ensures your important files are stored in a secure location, separate from the operating system. This is especially useful if you ever need to reinstall Windows or deal with system crashes.
- Leave Some Unallocated Space For Future Use: It’s often a good idea to leave a small amount of space unallocated so that you can easily resize partitions or create new ones in the future, as storage needs change.
With these tips in mind, you can optimize the way you partition your hard drive, ensuring better performance and easier file management.
FAQs:
On a hard drive using the MBR (Master Boot Record) partition style, you can have up to four primary partitions, or three primary partitions and one extended partition with multiple logical partitions. On a drive using the GPT (GUID Partition Table) partition style, you can create a virtually unlimited number of partitions, though Windows usually supports up to 128 partitions per drive.
* MBR (Master Boot Record): Older partition style, supports up to 4 primary partitions and a maximum disk size of 2TB.
* GPT (GUID Partition Table): Newer partition style, supports more than 4 partitions and disk sizes larger than 2TB. It’s recommended for newer systems and drives over 2TB.
Yes, you can resize a partition after creating it by using the Shrink Volume or Extend Volume options in Windows Disk Management. However, shrinking or extending a partition is subject to available free space on the drive.
* Primary Partition: This is a bootable partition that can contain the operating system. You can have up to four primary partitions on a single drive.
* Extended Partition: This is a non-bootable partition used to create additional logical drives. It can hold multiple logical partitions, which can bypass the four-primary-partition limit.
Partitioning divides the hard drive into different sections, while formatting prepares a partition to store data by setting up a file system (like NTFS or FAT32). Formatting a partition will erase all the data on it, while partitioning simply allocates space.
Conclusion
There you have it, you’ve successfully partitioned your hard drive in Windows! By following these steps, you’ve created additional partitions for your operating system, data storage, or other specific purposes. Remember to always back up your important data before making any changes to your hard drive. Did you find this guide helpful? Let us know in the comments below.
